|
The design goal for this project was
durability. If I was going to spend money to do this, I
wanted a part that would stand up to some abuse. I wanted to
buy the best parts I could afford, so that I wouldn’t have to go
back into the thing later or be wishing “If I’d just spent another
$50 ...". The intention was to be
able to drive the car to the track, race all day, then drive
home. The other goal was to be able to assemble the whole deal
myself. I’ve got copies of lots of magazine articles that talk
about the do-it-yourself aspect, then they go to Currie, Strange
or some other professional and photograph the work being done. So
– can a regular person really do it and make it work? Yes and here is how I went about it.
A parts list and references with links are at the bottom of page
4.
First thing, figure out exactly what you
have to work with. I had a Torino housing lying in the shed. It
had the heavy duty center piece and large bearing ends. It also
had flats on the tubes, which would prevent it from being
shortened using the stock tubes. I also had a 9” chunk with 3.00
gears. I took the existing 8” completely apart and measured
everything. The dimensions that turned out to be important were
the housing width, leaf spring pad location, brake hat offset from
the backing plate mounting flange, brake drum register diameter,
axle retainer flange hole locations and housing end bore.
Armed with this data, I begin making phone calls. My initial
selection of a vendor, which turned out to be the ideal selection,
was Peyton Performance Automotive in Waxahachie, Texas. Paul Peyton has been in the chassis
and rear end business for quite a while and knows what works and
what doesn’t. Peyton’s also carries a complete line of items for
this type of project and the company was located only 200 miles
from the house. Mr. Peyton’s patience and advice was invaluable.
The main question was about differential selection. I was leaning
toward a posi unit. Peyton indicated that was good for street and
general performance use. However, he indicated that it could be
turned to toast in a burnout situation. One wheel in the water
box and one wheel out – bye, bye posi. His suggestion was the
TruTrac Detroit Soft Locker. I thought that a Detroit Locker was
overkill for this application and might be too aggressive. He
assured me that the Soft Locker was a newer, more driver-friendly
unit that was not as harsh as the original Detroit Locker. As for
axles, Mr. Peyton informed me that Mark Williams had recently
introduced a line of street axles (The Master Line series) that
were comparable in quality to their race axles. They also had a
bearing that would allow me to use small Ford housing ends,
keeping my existing brake setup, and still use 31 spline axles.
Richmond Gears were pretty much a given. I picked a 3.70 ratio
for a good compromise between cruise and performance.
I carted my 9” housing and my old 8” housing
over the Peyton’s shop in Waxahatchie. By giving him the old
housing, he was able to construct the new housing with the stock
pinion angle and the correct leaf spring pad locations. The 8”
housing was 54 3/16” wide. Peyton suggested we shorten the new
one a little to 54”. That was fine as I needed a little extra
clearance for my 275-50x15 BFG Drag Radials. With the housing
width agreed upon, Peyton could order the axles. He also replaced
the stock tubes with 3" thick wall round tubing. We
finalized the work order with all the little items – wheel studs,
axle retainers, u-bolts, gears. I left the housing with Peyton
and headed home to round up the other stuff.
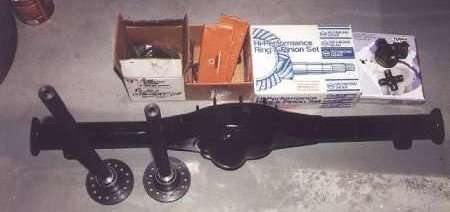
I decided to buy the installation kit
from Randy’s Ring and Pinion, because it comes with very complete
instructions. The kits also include Timkin bearings. I ordered a
solid pinion spacer kit to go with the rebuild kit. By the
way, don’t toss the tail bearing retainer. It’s supposed to be
reusable and is not in the kit. I got a new one from the Ford
dealer. I used the standard long yoke with the 9" and did not
have to modify the driveshaft. I used a Motorsports U-joint to
mate the driveshaft to the wider yoke on the 9 inch.
|